
Blog
How To Fix All In One WP Migration Import Stuck 2024
Facing All In One WP Migration import Stuck?
All-in-one Wp Migration is a freemium plugin that allows users to export a WordPress site’s content, media files, plugins, and theme as a single file in one click. This Exported file or Backup can then be uploaded or migrated to a new site via FTP, cPanel, Google Drive, and more.
This plugin is designed to be user-friendly and easy to use, so naturally it makes the migration process easier and accessible to anyone for free. However, users may occasionally encounter an issue where All In One WP Migration gets stuck and fails to make any further progress.
This happens to be a common issue even experienced WordPress users encounter from time to time, and after some research, I discovered a major contributing factor behind this issue.
Click Here To Download Version 6.7 of the All-in-One WP Migration Plugin
What Is ModSecurity?
This is simply a web application firewall that protects your site from malicious injections, and according to one of the developers, this upload interruption may be attributed to ModSecurity.
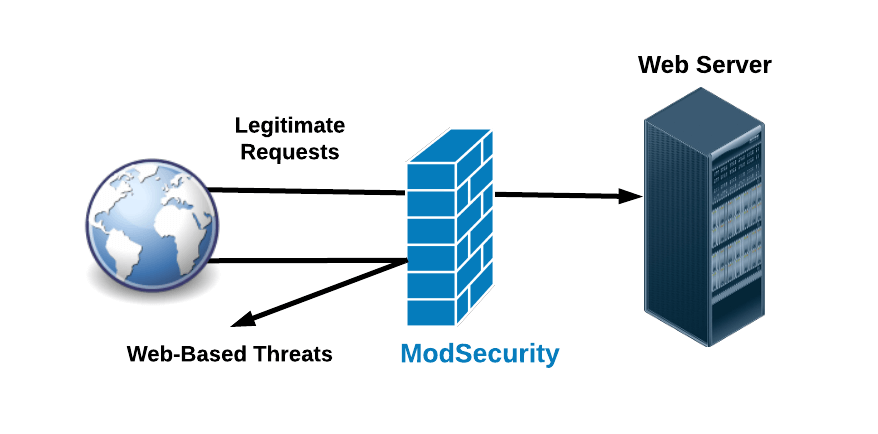
ModSecurity is a security feature commonly found in web hosting environments that has the potential to block file uploads from unrecognized sources, including valid changes made by website owners. Luckily there is a fix to this All In One WP Migration import getting stuck.
Solution To All In One WP Migration Import Stuck
For the sake of clarity, I’d be using the following terms:
- Website One as the source website you wish to migrate from, and…
- Website Two as the destination website you wish to migrate to.
The solution here lies in taking a different approach in uploading the exported Backup File from Website One into a folder called ai1wm-backups of Website Two All In One WP Migration.

This folder so happens to be where this Migration plugin exports and stores its backups.
The idea here is to upload the backup file from Website One to Website Two without relying on the import function of the All-in-One WP Migration plugin. By manually uploading this backup file to the mentioned folder, the plugin will automatically recognize the backup file.
Then, we can proceed to use the “Restore” feature to complete the migration process All In One WP Migration.

However, there is a little setback with using the restore functionality on the updated versions today, as the restore functionality is now part of the paid extension.
Luckily, I’ve scoured the internet to fetch you an untampered version 6.7 of this plugin, which enables us to use the Restore feature without issues or complications.
All-in-one WP Migration 6.7
1. Install Migration Plugin
Now comes the part where we need to install the plugin provided above to Website Two.
To do so, Navigate to the “Plugins” section on the admin menu and click on → “Add New.”
Next, click on the “Upload Plugin” button to choose and manually install the plugin.

If you have an updated version of this plugin, it may be best to deactivate it before activating version 6.7. There seem to be conflicts between both versions, even when the intention is simply to downgrade to the previous version.
2. Upload Backup File To ai1wm-backups
I’d assume you’ve exported and downloaded the Backup File from Website One to your local device. So, let’s move on to upload the Backup File to Website Two.
Just so you know, there are multiple ways to upload this file to your website’s files, including using FTP, cPanel, or a file manager plugin. For convenience, we would be using a File Manager Plugin to accomplish this task.
However, if you are familiar with uploading files to your website’s database using any of the means I mentioned above – please, by all means, go for it.

- Let’s start by Installing the Plugin “File Manager” by mndpsingh287.
- Next, open up the File Manager plugin, and navigate the folders using the following path.
- Public → wp-content → ai1wm-backups.
Once you are in the ai1wm-backups folder, click the Upload icon to select the backup File.

When the Backup File is selected, you should find its upload progress on the right side of your screen, and you may have to give it some time to complete the upload, depending on its file size and the speed of your internet connection.

3. Restore Backup Files
When the upload is complete, the all-in-one migration plugin should be able to recognize this file on Website Two, and we simply need to open up the backup sub-section of this plugin by:
Hovering over All-in-one WP Migration → To Select Backups → Then use the Restore Button.

This should initiate the Migration process, and after it’s done, you should get a prompt notifying you that your current site’s data will be overwritten with the new one.
Proceed to click on the → Proceed button to continue.

Once the restore is successful, proceed to review the front end of your site to ensure everything is indeed intact and functional. Additionally, you may want to follow the prompt guide to make necessary adjustments where needed, including your permalink structure.
How To Increase Maximum Upload File Size
So, you’ve tried using the steps above, only to be greeted by some file size limits. How about I show you how to increase the maximum upload file size so you can migrate larger websites without restrictions? To do so, we’ll have to change two numerical values in the plugin’s file.
I would urge you not to worry about making edits to the plugin’s file as I will be here to guide you through the process. To open the plugin file editor, please follow these steps:
- Log in to your WordPress admin dashboard.
- Navigate to the “Tools” section of the admin dashboard to Select “Plugin File Editor.” This should open up a page that displays a list of installed plugins on the right-hand side.

Note: Be cautious from here on out when editing the plugin files, as any incorrect changes may break the functionality of the plugin or your entire website.
- Let’s proceed to select the All-in-One Wp Migration plugin from the drop-down menu, after which you’d want to click on the “Select” button next to the drop-down menu.
- This should load the plugin’s main file in the code editor and we just need to need to select the constants.php file underneath the storage option.
- Next, I’d need you to left-click on the first line of code before <?PHP, and then use the keyboard shortcut “Ctrl+F” or “Cmd+F” to bring up the search field (as displayed below).

- Then type “Max File Size” into the search field and hit Enter on your keyboard. This should bring us to line code 282 with the highlighted text we just entered. Underneath this text, we should find the value; “AI1WM_MAX_FILE_SIZE’, 2 << 28”.
- Now change the number 28 to a higher value of 40, and that’s it.
- Don’t forget to save your changes by clicking the Update file button.

Lastly, let’s head back to the plugin’s import dashboard, and you should find the same upload file size of 2 TB, and that’s it. Please make sure to read the conclusions section.

Final Thoughts & Conclusion
Before you leave, it’s important I brought to your attention the dangers of using or leaving outdated plugins on your site, as they can pose significant security risks, potentially resulting in unauthorized access, data breaches, and compromised website functionality.
In essence, as soon as you are done with the plugin version shared in this article, It is crucial to update it to the recent versions or remove it entirely from a website.
Hopefully, this method works out for you, and if it did it would mean so much if you leave a word or two in the comments below, BLOG harougapro also feel free to ask related questions.